Back in 2022, we introduced the basics of Microsoft Bookings—how to set up your calendar, add services and staff, and share your booking form. It has become one of our most popular blogs, if you missed it, you can check it out here.
But there’s more to Bookings than just the basics. Over the past few years, Microsoft has continued to refine the platform, adding useful features designed to make appointment scheduling even smoother—particularly for small to medium-sized businesses.
In this follow-up, we’ll highlight some lesser-known but powerful features you can take advantage of. Whether you're looking to reduce no-shows, gather more customer info, or get better oversight of your bookings, there’s something in here for you.
Customising Email Confirmation and Reminder Messages
We mentioned email reminders briefly in the last blog, but did you know you can fully customise the confirmation and reminder messages sent
to your customers?
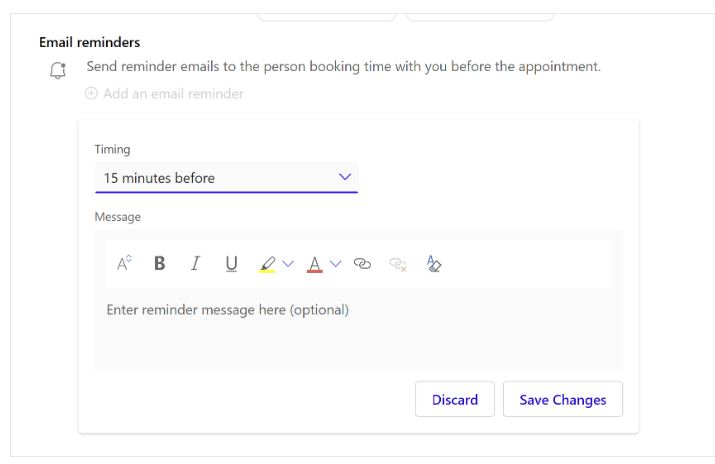
You can:
- Add links to important documents or policies
- Remind clients to bring specific items
- Include directions to your office
- Reiterate cancellation or rescheduling policies
How to Set It Up:
- Navigate to the Microsoft Bookings Web App and sign in.
-
Select the 'Services' tab from the navigation pane.Microsoft
Support
- Choose an existing service to edit or click 'Add a service' to create a new one.
- Scroll to the 'Notifications' section.
- Enter your customised messages in the 'Email confirmation', 'Email reminders', and 'Email follow-up' fields.
Note: Multiple reminders and follow-up messages can be created for each appointment.
Adding Buffer Time Between Appointments
Bookings gives you the option to add buffer time before and after each appointment. Thi s
is perfect if:
s
is perfect if:
- You need a few minutes to reset between meetings
- You want to avoid back-to-back bookings
- You offer online sessions and need to update notes between calls
How to Set It Up:
- Access the 'Services' tab in the Microsoft Bookings Web App.
- Select a service to edit or create a new one.
- In the 'Basic details' section, locate the 'Buffer time' option.
- Enable buffer time and specify the duration before and/or after appointments.
Note: Buffer times are included in the total duration displayed on your calendar, which may affect how appointments appear.
Collecting Additional Customer Information with Custom Fields
Need more than just name and email from your clients? You can add custom fields to your booking form to collect details like:
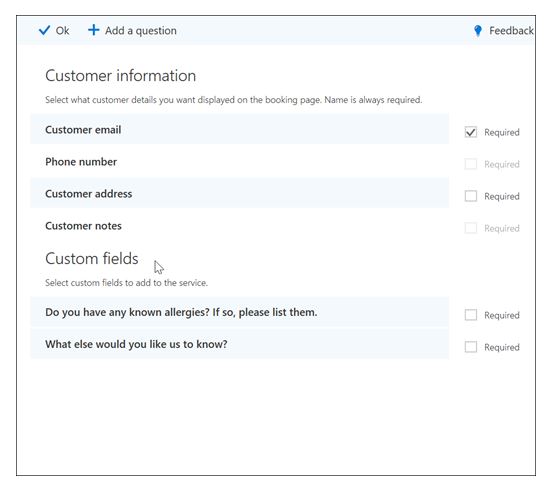
- Phone numbers
- Company names
- Preferred contact method
- Any other information that helps you tailor the appointment
How to Set It Up:
- Go to the 'Services' tab in the Microsoft Bookings Web App.
- Edit an existing service or add a new one.
- Navigate to the 'Custom fields' section.
- Click 'Modify' to adjust existing fields or 'Add a custom field' to create new ones.
- Define the information you wish to collect (e.g., "What would you like to discuss during your appointment?").
- Save your changes.
Setting Different Availability for Each Service
If your team provides multiple services, they likely don’t all run at the same times. Bookings lets you set different availability for
each service.
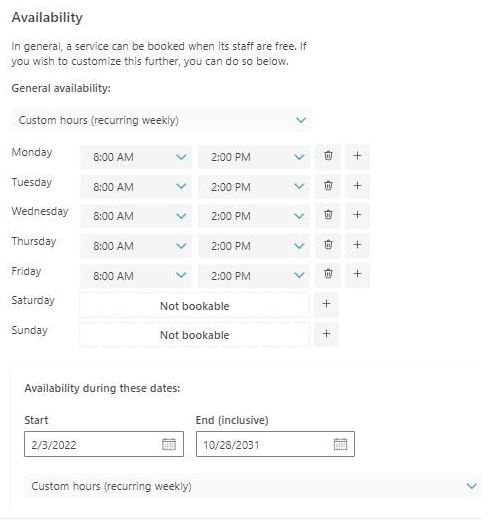
For example:
- Initial consultations might be offered on Mondays and Wednesdays only
- Training sessions could run just in the afternoons
- Site visits may need a longer buffer or only occur on Fridays
How to Set It Up:
- Access the 'Services' tab in the Microsoft Bookings Web App.
- Select the service you want to modify or create a new one.
- Go to the 'Availability options' section.
- Choose 'Custom hours' to set a specific weekly schedule for the service.
-
Alternatively, to set availability for a specific date range:
- Click 'Add a different date range'.
- Enter the start and end dates.
- Select the desired availability settings for that period.
Integrating Microsoft Forms for Surveys or Intake Forms
Integrating Microsoft Forms
allows you to gather detailed information from clients before their appointments.
To include a survey or intake form in your booking process:
- Create a form using Microsoft Forms.
- Obtain the shareable link to the form.
- In Microsoft Bookings, go to the Services tab and select the relevant service.
- In the Reminders and Confirmations section, add the form link to the confirmation or reminder emails.
This method enables you to gather additional information or feedback from customers seamlessly.
For a visual guide on creating reminders and follow-up emails, you might find this video
Microsoft Bookings continues to grow in capability, and these advanced features can help you save time, improve client communication, and make your calendar work harder for your business.
If you're already using Bookings and want to explore these extras—or if you'd like a hand setting things up—get in touch with us.